Filters
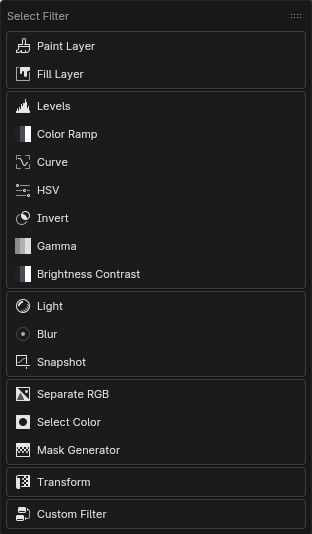
All layers in HAS Paint can be modified with filters. Filters can be added through the action menu, and they serve as a way to manipulate the textures directly, giving you greater control over the final look of your materials.
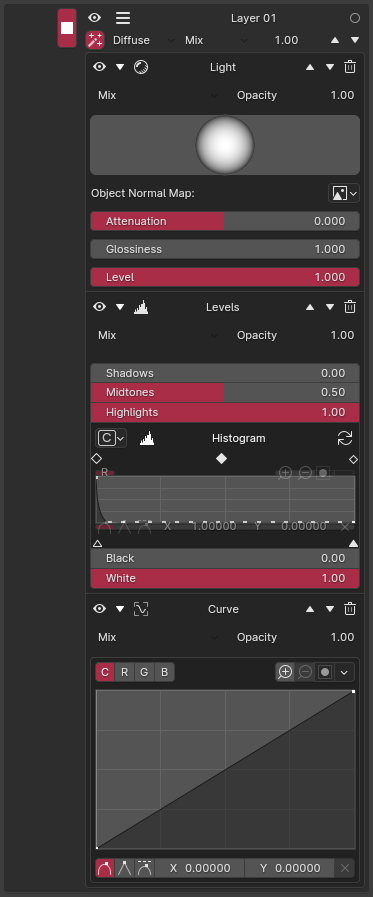
Adding a filter to a layer results in a few noticeable changes. The layer will now be marked with a filter icon, and selecting the layer will reveal a column with all the filters that have been assigned.

Applying Levels
Applying Mask and Light filter
Filter
Levels
This filter allows you to control the levels of an RGB image, with controls similar to those found in image editing software. It also has the option to display a histogram of the current image by updating the histogram.
Color Ramp
Helps adjust the image contrast or adds color to a black and white image. It is useful for creating artistic effects or emphasizing specific tones.
Curve
Allows control over the colors of an image using RGB curves. This is useful for fine-tuning the brightness, contrast, and color balance of the layer.
HSV
Uses a **Hue Saturation Value** node to adjust these properties of the image. This filter is useful for color manipulation, such as shifting hues or changing overall saturation.
Invert
Inverts the color values of the image, effectively creating a negative effect. This filter can add interesting visual effects or be used in masking techniques.
Gamma
Controls the gamma of the current layer. It allows you to adjust the midtones without affecting highlights and shadows too much.
Brightness Contrast
Adjusts the brightness and contrast of the current layer. It is simple but effective for balancing the look of your textures.
Paint Layer
This filter allows adding a simple paint layer to the existing layer.
Mask By Color
Selects specific colors in the image to mask. This is useful for isolating and editing areas based on their color properties.
Mask Generator
Generates a mask using grunge textures and realtime or baked maps such as Ambient Occlusion (AO), Curvature, or Position.
Light
Fake light based on geometry or baked Object Normal Map
Blur
Takes a snapshot of the current layer and creates a blurred image.
Snapshot
Takes a snapshot of the current layer, allowing you to reuse it in other parts of your workflow. It essentially saves the layer state so you can apply it elsewhere.
Transform
Translates, scales, or rotates the current layer. This filter allows you to manipulate the positioning of your texture without manually adjusting UVs.
Custom Filter
Allows for the use of a custom node group, created by users. It should have at least one input and output. The add-on automatically displays all input sockets, enabling users to edit properties and change inputs as needed.
